Making A Blog Site with RStudio, R Markdown and Blogdown Part II
This is the continuation of Part I. In this section I am going to cover setting up Blogdown, Hugo and Github Pages to start blogging. This is essentially a mix of the excellent guides by Amber Thomas, Jente Hidske and Robert McDonnell. However if you want a one stop solution with some of my personal twists, here it is!
I am going to assume you are using Microsoft Windows because that is what I use. The process should be largely the same for Linux and Mac OSX but you may need to install extra softwares such as Homebrew. If you see an item like < something >, that means replace it with whatever something indicates (ie: your username, directory name etc etc) minus the angle brackets. Once you finished every step you should be able to access your online website at https://<your username>.github.io/.
Blogdown and Hugo
Hugo is a static website delivery system. It is very easy to create a website with consistent theme and styling using Hugo. The only problem for us is that Hugo does NOT inherently support R Markdown. This is why we need Blogdown, the brainchild of Yihui Xie (aka Emperor of R Markdown, First of His Name), to bridge the water.
Setup
- Launch RStudio. Type the following command to install Blogdown and load it into R.
install.packages(c('httpuv', 'devtools'))
devtools::install_github("rstudio/blogdown")
library(blogdown)- Install Hugo using the following command:
install_hugo()Right now we can actually start generating a new site. However it is a good time to go set up our webhost first.
Github (Pages)
Github is an online repository site utilizing the Git technology. Normally Github is used for version control in software development. However it has a lesser known functionality called Github Pages which is essentially free webhosting for static websites.
Here’s a bit of tangent on how Github works. Skip straight to Setup if you are not interested. On Github you have repositories. Think of them like document folders for different projects. Your Github account is essentially an online desk where you keep all of these folders/repositories inside and the underlying git version control software is like the secretary. When you want to take a look at a particular project, you tell git to give you a copy/clone of the repository containing that project to keep on your own desk. This then becomes your local repository.
You might then make some changes and add different things to the local repository. As you make changes you can make snapshots of your progress by telling git to commit changes so you can revert to this point if you mess up later. Kind of like creating save files when you are playing a video game. Note that up to now all of your changes only happen in your local repository. Once you are really done for the night you can tell git to push the changes to Github and git will make all the changes to the online repository to match your local repository.
Github Pages is basically a special repository for you. Github will render html files inside this repository as webpages if someone types out the correponding url in a web browser. This means you can use this repository as a personal webhost and maintain it using git. That is what we are trying to achieve.
Setup
We are going to set everything up for a technique called submodule. I will explain the reason later. In the mean time you should follow the steps below EXACTLY.
Sign up for a (free) account on Github. Choose a reasonable username because that will be part of the URL pointing to your site.
Download and install Git.
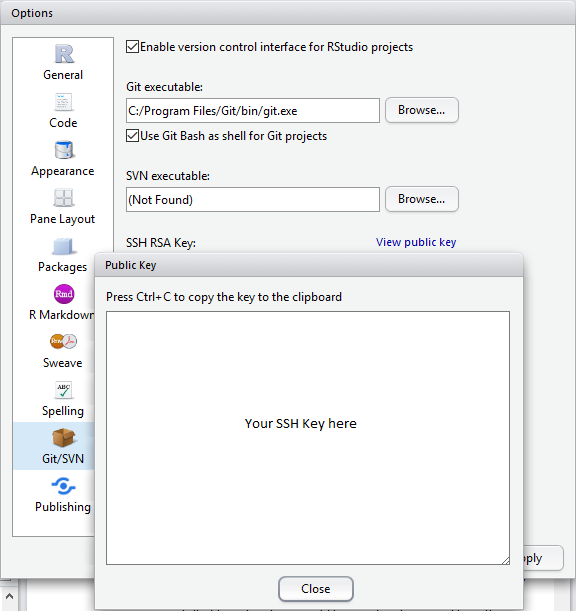
Configure it for RStudio by clicking on Tools \(\rightarrow\) Global Options \(\rightarrow\) Git/SVN. Set the path to the git executable (default:
C:/Program Files/Git/bin/git.exe). Check the box for Using Git Bash.Click on Create RSA Key…. Leave everything at the default values (passphrase and confirm are blank) and click Create.
Click on View public key and copy the text into clipboard.
Go to Github, click on your profile on the top right and select Settings. Click on SSH and GPG Keys on the left and press the green New SSH key button. Type whatever name you want for the title and paste the block of text you got from the last step into the Key textfield. Add the key.
Creating Github Pages repository: Go to Github. Click on New Repository. Select Initialize this repository with a README so your repository comes with a README.md file. Name this repository <github username>.github.io
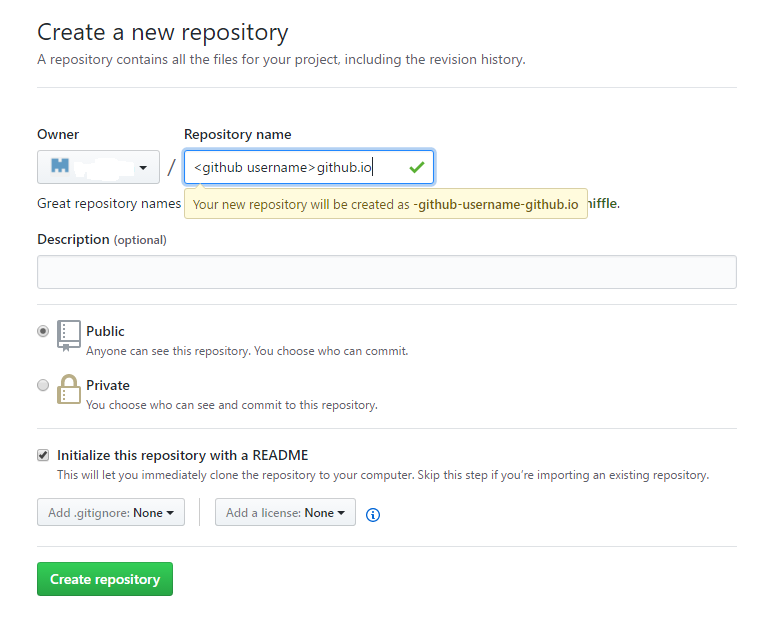
Creating source repository: Go back to the front page for Github and make another repository. The name doesn’t matter. I named mine blog-source. However make sure you deselect “Initialize this repository with a README”. Once the repository is created you should see a URL to this repository under Quick Setup in the form of
https://github.com/<github username>/<source repository name>.gitCopy this into clipboard.Launch RStudio. Click File \(\rightarrow\) New Project… and select Version Control \(\rightarrow\) Git. Paste the URL for your source repository under Repository URL. Choose a location to create your local repository under and click Create Project. RStudio will automatically switch to your local respository afterwards.
We are now ready to generate our new site and configure it to use Github Pages as the webhost.
Site Creation & Submodule
Here’s a bit of explanation on what we did before. Again, skip to Setup if you are not interested. The reason we are using two repositories is because Hugo generates the website into a subdirectory called public. Unfortunately, Github Pages for personal websites only serves homepage from the root of its master branch. To work around this we are going to link our public directory in the local repository to our Github Pages repository while the root directory of our local repository remains linked to the source repository. Thus, if we commit then push changes in the root of our local repository, all the changes will go to the source repository. If we commit and push changes in the public subdirectory though, they will instead go into the Github Pages repo. As I have foreshadowed, this is realized using submodule.
Setup
In RStudio, open the project we just created and make sure Blogdown is loaded using
library('blogdown'). Typenew_site()to create a blank site with the default theme. The homepage will show up in viewer. Click the red stop button to quit the viewer and go back to console.Launch Git Bash terminal.
In the terminal, you should be in the directory for your local source repository. There should be a subdirectory called public. Delete it with the command
rm -rf public.In the terminal, type the following command (one single line!) to clone your Github Pages repository into a subdirectory called
publicusing submodule. Remember to replace with your own username.
git submodule add -b master git@github.com:<username>/<username>.github.io.git publicDouble check by typing
git remote show originin the terminal under the root directory of your local source repository. The origin should point to your online source repository.Type
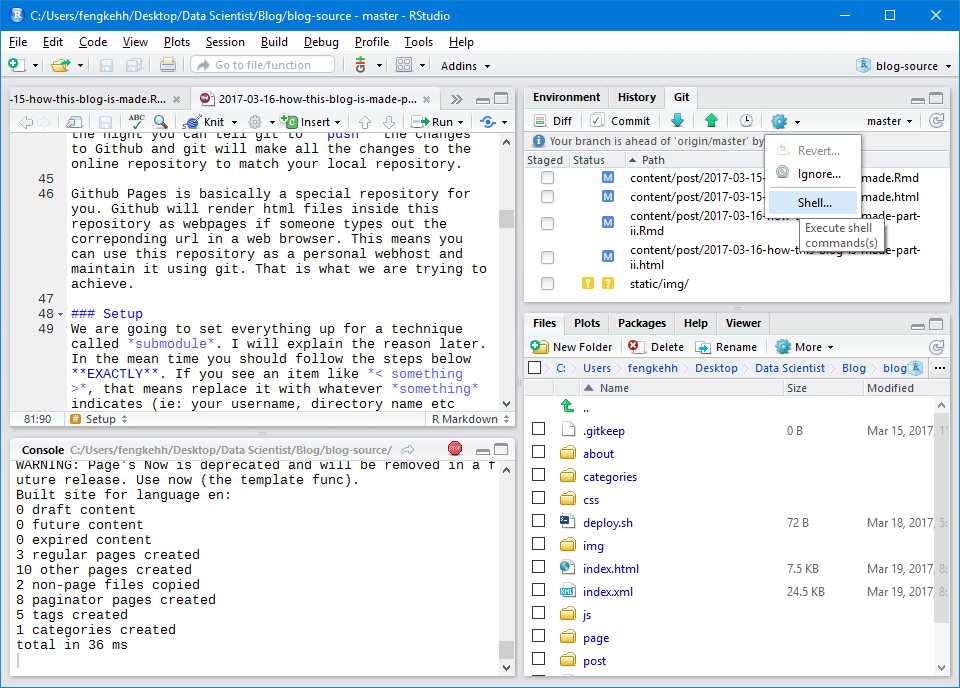
cd publicandgit remote show originagain. This time it should point to your Github Pages repository.In RStudio, you should see a file called .gitignore in RStudio’s file browser. Click on it to edit it. Add a new line
public/at the bottom. Save the file.
Site Configuration and Deployment
Time to configure our site and deploy it for the first time!
- The default theme is a bit barebones so you might want to install a new theme using the following command in RStudio with blogdown loaded:
install_theme('<creator github name>/<theme name>')For example, this blog site uses the Mainroad theme. So I typed install_theme('Vimux/Mainroad') to install it. Notice that there is no leading or trailing /. After installation, open config.toml in your root folder and double check that the variable theme has been set to your theme of choice.
To use \(\LaTeX\) expressions you must enable the mathjax javascript. I adopted YiHui Xie’s approach. Copy the highlighted code chunk and insert it into a layout specification that you are sure to be loaded on every page by your theme. I inserted it into the footer.html file located under
themes/<theme name>/layouts/partials/.There are other self-explanatory settings in config.toml that you should change. For example, title, baseurl, author name and descriptions, etc.
Use
new_post('<title>')to create a new blog post as a .Rmd file.If you want a preview of your site, type
serve_site()in RStudio to start a local server with a copy of your website on display.If you are satisfied, build the online version of the site using the
build_site()command in RStudio. After that you can use git to push the web pages inside your public/ folder into the Github Pages repository. I have modified Jente Hidske’s shell script into a R script to streamline deployment:
## Customized R function to facilitate fast site deployment
require(blogdown)

deploy <- function() {

    # Make sure things are commited
    output <- system('git status -s', intern = TRUE)

    if (length(output)) {
        print('Dirty work directory. Commit/revert changed files first.')
    } else {
        # Remove old website
        unlink(list.files(path = './public', full.names = TRUE),
               recursive = TRUE)

        # Build website from source
        build_site()

        # Push site
        message <- paste('Site rebuild', as.character(Sys.time()))
        setwd('./public')

        fileConn<-file("deploy.sh")
        writeLines(c('git add -A',
                     paste('git commit -m', ' \"', message, '\"', sep = ''),
                     'git push'),
                   fileConn)
        close(fileConn)

        setwd('..')
        print(message)
        print('Go to ./public and execute ./deploy.sh')

    }

}
Once you copy the above code into an empty .R script file, save it as deploy.R and use source('deploy.R') to load the script into memory. Whenever you want to deploy your site, first commit your changes to the local source repository (ie: by RStudio Git GUI or command line), then type deploy() in RStudio to build the site. Once that is done, go to the terminal and type cd public to go to the Github Pages local repository. Type ./deploy.sh to complete deployment.
I also recommend that you create a file named .Rprofile in the root of your local source repository. Inside I put common commands that I want RStudio to run every time it loads the project for the website. For example:
# Required library/files
library(blogdown)
source('deploy.R')

# Default Options
options(blogdown.author = '<your name here>')
options(blogdown.rmd = TRUE)